3 Version control
All right: we know enough Python, now, to be able to do something sensible; but before we go full out and start code we need to talk about version control.
If you simply have no idea about what version control amounts to, congratulations: you are in the right place. If you safely practice version control, already, you are probably good to skip over this chapter. Anything in between is probably worth a cross check. If you are under the impression that creating a zip file every once in a while with a sequential number attached to it is enough, or you have developed a custom-made set of scripts for the purpose, you should probably pause for a second and re-think the whole thing through.
Fortunately, you live in a time when version control is a no-brainer. In the old days people used CVS, and RCS before that. For a glimpse of time SVN experience some popularity, before people made up their mind and decided that distributed systems were the way to go. Then for a few years mercurial and Git competed with each other, before the latter took over the World. Nowadays it is fairly difficult to find any reasonable project not using Git for version control. That probably means something, and we might as well all stick with it. (By the way, Git was written by Linus Torvalds, the mastermind beyond the Linux kernel.)
3.1 Version control basics
Version control: (also known as revision control, source control, and source code management) is the software engineering practice of controlling, organizing, and tracking different versions in history of computer files—primarily source code text files, but generally any type of file. (Verbatim from Wikipedia.)
As you can see, version control is much more than just keeping track of which exact version of every file in your codebase you are using at any given time. Sure enough, version control allows you to freeze forever a specific configuration of your codebase, but the point is really to collect all the relevant metadata specific to any given change—what, when, by whom, and why?—in a form that can be effectively used to track the development process in a meaningful way.
As usual, let us start with some basic terminology.
Repository: the place where files current and historical data are stored.
Revision or version: the state at a point in time of the entire tree in the repository.
Clone: process of creating a repository containing the revisions from another repository.
Working copy: a local copy of files from a repository at a specific revision.
Checkout: the action of creating a local working copy from the repository.
Change or diff: a specific modification to a set of files under version control.
Commit: the process of writing the changes made in the working copy back to the repository.
Quite a few new things to commit to memory, isn’t it? But don’t worry, this is not nearly as bad as it seems. The main thing is: all the code lives in a repository. Not in an ordinary folder on your laptop or in a memory stick; not in your email attachments. In a repository. And, since we are at it: in a Git repository. Your responsibility in your day-to-day workflow as a software developer is to interact with the repository so that the latter can efficiently keep track of what’s happening. It is as simple as that.
3.1.1 Centralized and distributed systems
In the old days version control was implemented locally. And yet some of the main ideas that are at the base of modern version control stem from these early systems—most notably the fact that when you change a file (and, quite possibly, only a few lines in a file) you don’t actually have to keep a copy of each version of the file. If you store the differences between revisions in a database you are all set, as you can always recreate what any file looked like at any point in time, and potentially you save a lot of memory. That is a neat idea: keep track of changesets, not files.
The advent of computer networks brought about the centralized version control systems such as CVS and SVN. This was by far the most popular model through most of the ’90: you have a single, central server containing all the versioned files with whom an arbitrary number of clients can interact. The basic workflow is therefore:
- you check out a local working copy from the remote server;
- you modify the working copy;
- you commit the changes back to the repository.
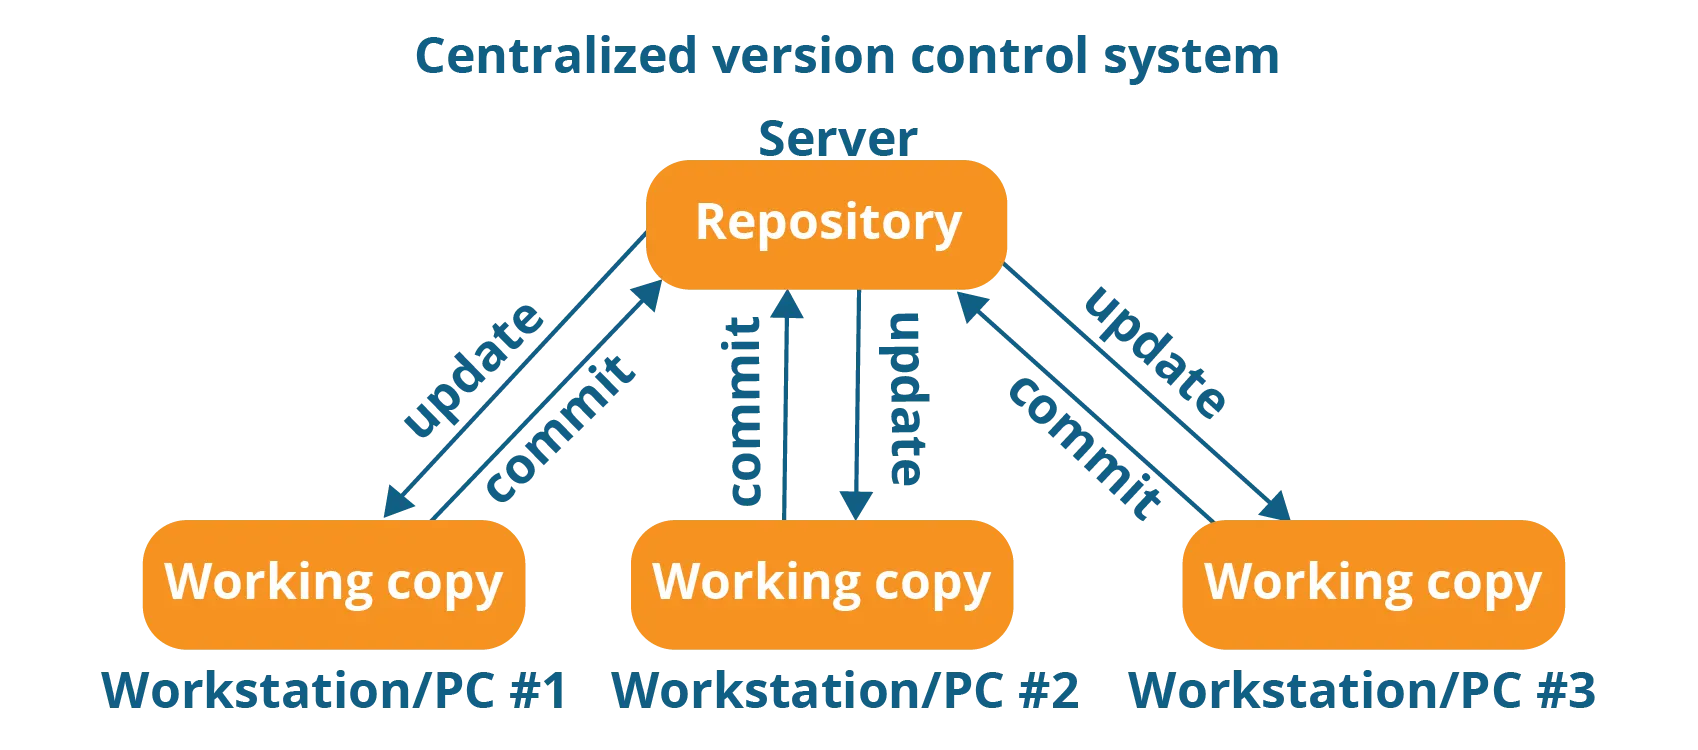
If you think about, this makes a lot of sense. At any point in time there is a single, ultimate authority (the remote server) that everybody else has to conform to. If users A and B start working on the same file in their own local working copies, the rules are clear: if A commit their changes first, B will need to adapt to it because the server will not let them commit further changes unless all potential conflicts are resolved. The nice thing is that the process is beautifully linear. It is not by chance that Subversion used to assigns a sequential number to the repo at each commit.
Then distributed version control systems came about. A distributed system, as the name suggests, is one in which every client fully mirrors the repository, including its full history. All of a sudden there is no more a central server and constellation of clients, but rather a collection of machines containing exactly the same information. As you might imagine, this allows for a much richer variety of workflows. If you have the full repository on your laptop, for instance, you might imagine committing changes from your local copy to the repo while you are comfortably working on a airplane, disconnected from the network—how awesome is that? The fact is, if user A can do that, so can user B, and when they get off their respective planes and get back online, something new has happened: the repositories that were once identical are no more in synch. This is a big issue. Or not?
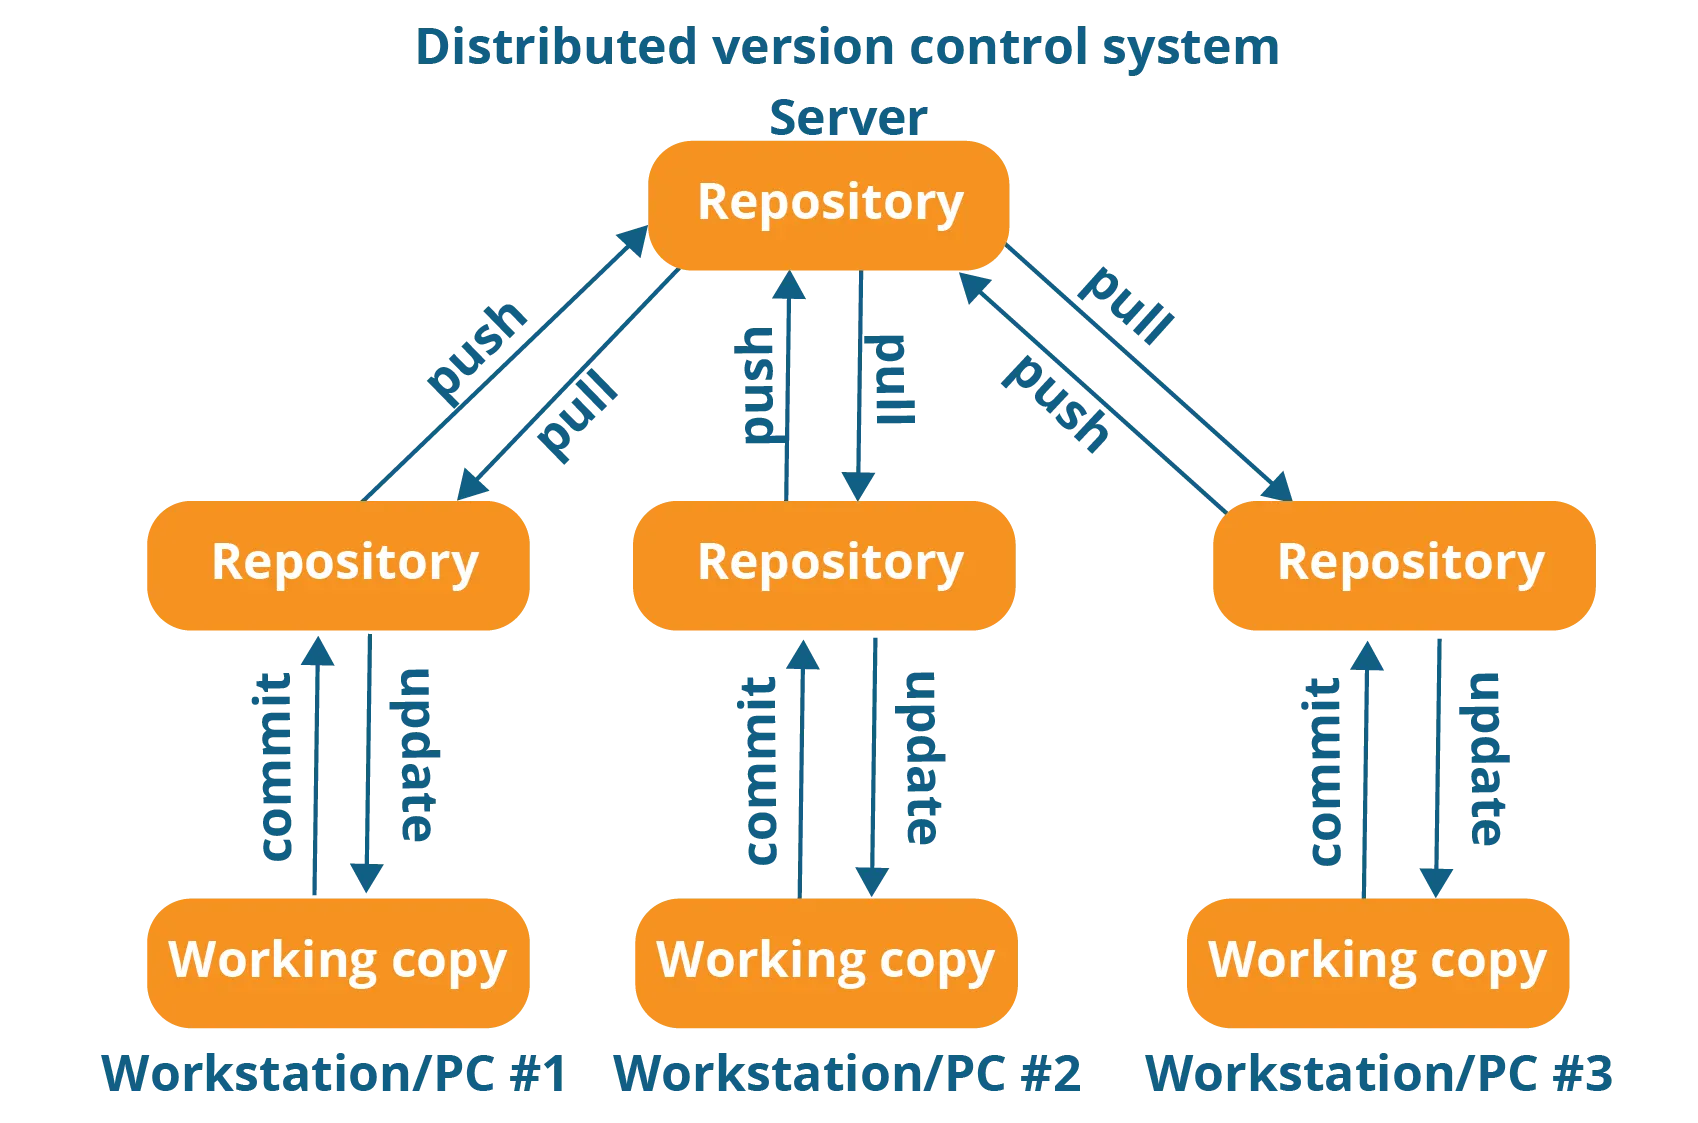
Well, it is and it isn’t—Figure 3.2 shows a typical arrangement implementing a distributed version control system. Look carefully and don’t be distracted by the fact that here too we have a server and a number of clients: while in principle all the repositories in a distributed server are on the same level, you do not typically want user A to be able to write directly on the machine owned by user B. From a security standpoint it is much simpler to have one server machine to which all users can write.
In practice this adds another layer to the workflow: you can commit changes to the local repository while seating on the plane, and you can later push the changes to the remote server that everybody else has access to. It is at the level of the push action that any possible conflict is merged.
This brings up an interesting aspect, though: when they get off the plane and back online, user A and user B can potentially want to push a series of commits to the repository that are interleaved in time, and no particular relation with each other. The concept of who is coming first and who is coming second, which is well defined in centralized system, is not directly applicable here. The workflow has become intrinsically non linear. This is why Git assigns a hash, and not a simple sequential integer, to each commit.
Make sure you got this right before you move on. Say A and B use SVN to collaborate on a project, and they start at revision 113. A pushes a commit to the repository, which is bumped to version 114. When they try and push their commit, user B finds out that the repo has changed, and there is a conflict between their changes and the new tip. At this point B has to manually review the situation, and incorporate whatever changed in version 114 into their changeset. Now user B can commit their changes, and the repository is bumped to version 115. The centralized workflow is linear.
Now, let us suppose that A and B are using Git, instead. The point is, when A and B commit changes to the repository, these commits happen on the local copies. Neither one sees what the other is doing. There is no concept of before and after, just two histories that for a little while proceed on parallel path. When A and B get to push the changes to the server, it is not like either local repository is ahead of behind of the other—they are just different.
3.1.2 Versioning single files or the entire repository?
This might sound like a silly question, but old version control systems tracked modification on a file-by-file basis. This is how CVS worked, for instance—by assigning an independent revision number to each singe file. You would have, e.g., file1 at version 1.3 and file2 at version 2.13.
All modern control systems track a whole commit as a new revision, and revisions are assigned to the entire repository. When you think about, this actually makes a lot of sense. Sure enough, versioning single files can give you the cozy feeling that you are doing a better job, because it immediately tells you what changed, without the need to dig into the file. At a second thought, though, files are not generally independent from each other, and you really need to know the status of the entire repository to reliably predict the output of your code. Ultimately, the full changeset is what matters, and modern systems provide facilities to inspect changesets across different files.
Since we are at it, I have personally witnessed cases where repositories are used to store different versions of the same file alongside (with different suffixes), e.g., my_file_v1, my_file_v2, my_file_v3 or, even worse, my_file, my_file_new, my_file_newer. When you do that, you are effectively borrowing somebody else’s problem, trying to do the work that the version control system should be doing and, ultimately, interfering with it. Don’t do it. When you modify a file and commit the changes, the old version is not gone. Should you need it, Git is there to serve it to you. Really.
For the same reason, resist the urge to copy and paste a block of code, comment the original (just in case you should need it in the future) and edit the copy. This will make diffs (i.e., visual comparisons across different versions) harder to understand, and unnecessarily so. Again: when you need to recover an older version of a file, Git has your back.
3.2 Hosting a Git repository
All right: we made up our mind and we are using Git for version control. Let us assume that we have installed Git on our computer. If you did read carefully, by now you will have realized that the next obvious question is: who is playing the role of the server? In other words: who is hosting our repository?
3.2.1 Self-hosting or not?
When it comes to where you physically host a repository, at the very top level you have two choices. If you have a machine that you control and to whom you can connect via a network, you can go ahead and place your repository right there. This is generally referred to as self-hosting.
Before you do that, though, think about for a second: do you really want to take on you all the hassle that comes with self-hosting? Manage the users, and setup the access permissions? Update the system as needed? Make periodic backups in case something goes wrong? No? That’s what I thought.
This is another no-brainer. Unless you are some kind of 007 that needs complete privacy over your code (which is by definition not the case if you are developing free software), go for a fully-fledged hosting service. That will provide you not only the core functionality, but also all the ancillary tools that you need in you daily workflow, such as a nice web interface and an issue tracker.
3.2.2 GitHub
You might know, already: these days everybody is on GitHub. Most of the big projects host their primary repository on GitHub—Python, numpy, scipy and matplotlib are just a few examples. (Well, not all of them. The Linux kernel lives on their own servers, so does GNU.) Most of the small projects are developed on GitHub. You might just go with the flow and do that, too.
Occasionally you hear people confusing Git with GitHub, so let’s get that straight: Git is a free and open-source program, while GitHub is a proprietary service offering hosting of Git repositories. It is a simple as that.
Of course nothing is straightforward as it seems. Launched in 2008 by a small group of developers, GitHub has been thriving since, building upon the popularity of Git as a version control system. Ten years later, in 2018, it was acquired by Microsoft, with the widely publicized intent to have it continue to operate independently as a community-driven platform. (Ah ah.) As of 2025, GitHub does not have a CEO and is operating as part of the Microsoft AI division, instead. The increasingly pervasive emphasis on AI did not go un-noticed in the community and more than a few prominent actors have grown vocally critic against the new course of action, see e.g. here and here.
Let’s be honest: this is not anywhere close to a generalized rebellion and almost certainly GitHub is there to stay for the foreseeable future. Sadly: if you don’t have an account, yet, you should probably get one.
3.2.3 Codeberg
On the bright side, Codeberg is an interesting reality that is slowly gaining traction. It is where most of the people fed up with GitHub are moving, and, for what it’s worth, where these lecture notes are hosted.
Codeberg is run by a non-profit organization based in Germany and provides a reasonably complete experience with a look and feel similar to GitHub, only with no AI. (Well, I will be completely honest and confess that it’s not yet at the same level, but it is definitely worth supporting because the underlying intent is admirable.)
Small piece of advice: if you create an account on GitHub, create one on Codeberg, too and experiment with it.
3.2.4 Digression: exchanging ssh keys
No matter which hosting service you use, creating your first repository is as simple as pressing a button and filling in a form with a handful of fields (name of the repository, visibility, license, main language).
Cloning a public repository on your computer is also largely trivial. You can clone the repo for these lecture notes, e.g., by doing
git clone ssh://git@codeberg.org/lbaldini/cmepda-basic.gitWe’re not talking about what actually goes into the repo, right now, but here is a useful reference. We shall get back to it in due time.
The tricky part comes when you actually need to push changes to the repo, because that’s where the server needs to authenticate you and make sure you have the proper write permission. So let’s elaborate a little bit on that.
“How do I get the url to clone my favorite repo”, you are asking? Easily said: it’s usually sitting somewhere on the top-right in the web interface of the repo itself. Github has a big green button called “<> Code”; Codeberg has a text box with a couple of buttons next to it. Both will give you the option of copying to the clipboard the clone link using either the SSH or the HTTPS communication protocol.
To make a long story short, HTTPS is ok for occasional cloning, I guess, but for regular development you definitely want to go for SSH. Citing the Codeberg documentation verbatim: in comparison to using HTTPS, SSH keys provide a safer and passwordless way to authenticate with Codeberg. It is recommended to use one key per client. This means that if you access your Codeberg repository from your home PC, your laptop and your office PC you should generate separate keys for each machine.
The only additional tiny barrier between yourself and the ultimate Git experience is the ssh key exchange. You don’t need to be an expert in cryptography to use Git, but a short digression might be useful, at this point.
SSH, or Secure Shell, is a network protocol and a set of tools for securely accessing and controlling a remote computer over a network. Creating an SSH key pair means generating two mathematically linked keys:
- a private key (keep secret): stays on your machine, optionally protected by a passphrase.
- a public key (share freely): you upload it to the server or service (e.g., GitHub or Codeberg).
The two work together via public-key (asymmetric) crypto. During login, the server sends a challenge; your SSH client proves it has the private key by signing that challenge. The server verifies the signature using the public key it has on file—no password travels over the network.
How do you actually get to exchange the key with hosting service? There’s plenty of documentation out there, including on Codeberg and GitHub. As soon as you are able to push your first commit to the server, you are all set!
3.3 Daily workflow
We are now ready to discuss in some details how you should go about the actual day-to-day workflow when developing software under version control.
3.3.1 More nomenclature
Before we move on, we need to enlarge a little bit our VCS glossary.
Branches: alternative paths where more copies of the same files develop in different ways independently.
main: the unique line of development that is not a branch.
Merge: application of two sets of changes to a set of files.
Conflict: changes to the same file by two or more developers that the system is unable to reconcile.
3.3.2 Git overview
The easiest way to have a quick overview of the large inventory of Git commands is to look at the help.
lbaldini@nblbaldini:~/teaching/lbaldini/cmepda-basic$ git --help
usage: git [-v | --version] [-h | --help] [-C <path>] [-c <name>=<value>]
           [--exec-path[=<path>]] [--html-path] [--man-path] [--info-path]
           [-p | --paginate | -P | --no-pager] [--no-replace-objects] [--no-lazy-fetch]
           [--no-optional-locks] [--no-advice] [--bare] [--git-dir=<path>]
           [--work-tree=<path>] [--namespace=<name>] [--config-env=<name>=<envvar>]
           <command> [<args>]

These are common Git commands used in various situations:

start a working area (see also: git help tutorial)
   clone      Clone a repository into a new directory
   init       Create an empty Git repository or reinitialize an existing one

work on the current change (see also: git help everyday)
   add        Add file contents to the index
   mv         Move or rename a file, a directory, or a symlink
   restore    Restore working tree files
   rm         Remove files from the working tree and from the index

examine the history and state (see also: git help revisions)
   bisect     Use binary search to find the commit that introduced a bug
   diff       Show changes between commits, commit and working tree, etc
   grep       Print lines matching a pattern
   log        Show commit logs
   show       Show various types of objects
   status     Show the working tree status

grow, mark and tweak your common history
   backfill   Download missing objects in a partial clone
   branch     List, create, or delete branches
   commit     Record changes to the repository
   history    EXPERIMENTAL: Rewrite history
   merge      Join two or more development histories together
   rebase     Reapply commits on top of another base tip
   reset      Set `HEAD` or the index to a known state
   switch     Switch branches
   tag        Create, list, delete or verify tags

collaborate (see also: git help workflows)
   fetch      Download objects and refs from another repository
   pull       Fetch from and integrate with another repository or a local branch
   push       Update remote refs along with associated objects

'git help -a' and 'git help -g' list available subcommands and some
concept guides. See 'git help <command>' or 'git help <concept>'
to read about a specific subcommand or concept.
See 'git help git' for an overview of the system.
This a lot of stuff. The Git cheat-sheet provides an alternative, interesting cross section on the matter.
3.3.3 Top-level good habits
We are all set: we have all the tools that we need to start writing software. Shall we start right away to push commits to the server as if there was no tomorrow? Probably not—we should have a rough workflow in place.
Here a small set of sensible, top-level rules you should stick to:
- keep the main branch always working and functional—it should never break;
- use short-lived branches for individual tasks, such as fixing a bug or implementing a new feature;
- if you can break a task in smaller sub-tasks, by all means do it;
- commit coherent changes when possible, as opposed to incomplete stubs;
- always test before merging;
- push regularly.
3.3.4 Beginning your day
Let’s dive into the gory details, and go through our full day of work, starting form the moment, early in the morning, when we get into our office and sit in front of the computer. First thing first, let us synchronize our local repository
git switch main
git pull --ff-only
git status
This moves you to main and update the branch, picking up changes that have happened since your last session. Most importantly, it only does so assuming that the main can be fast-forwarded, i.e., the local main and the remote main have not diverged—in which case a simple pull would silently create a merge commit. If the branches have diverged, Git just stops rather than making something up, and you can proceed to inspect the situation and choose the most appropriate course of action.
3.3.5 Getting started on the next, great feature
Now that we are up to date, we can start working on our next task, be it fixing a bug, improving the documentation, implementing a new feature, or anything else. Remember our good habits: make the task as small and self-contained as possible; try and break complex changes into smaller, simple ones—the latter are easier to review. Attack one problem at a time, try and isolate related changes in the smallest possible subset, and avoid as much as possible mixing unrelated changes.
The first step is to create a branch for your new endeavour; and, obviously switch to it. You achieve this with the commands
git branch name_of_the_new_branch
git switch name_of_the_new_branch
or, equivalently, with the more succinct version
git switch -c name_of_the_new_branchThis decouples your from the main branch, and from the work that your collaborators will be continue doing. The new branch can live for all the time that it takes for you to complete the task. When you’re done, you can merge the branch back into the main, and we shall come back to that in a second.
(It goes without saying, if this is not a new thing and the development branch already exists, you just switch to it and pull the changes instead.)
Since we are at it, here is another piece of advice. Pick a sensible name for your branches, and keep in mind that the branch name should express your intent. Examples of terrible names:
my_branchnew_branchawesome_branchbug_fix
Examples of sensible names (mileage may vary, depending on the application)
fix_issue_2376document_data_formatpoisson_likelihood
You can use a / as a separator and organize you branches with prefixes to indicate clearly whether we are talking about, e.g., a bug fix or a new features. Examples:
fix/issue_2376docs/data_format
You get the point.
3.3.6 Doing the actual work
We are all set to start doing something useful. Again on the good habits: organize your work in small, testable steps—do not wait for the full task to be completed to commit changes, as that makes it more difficult to provide granular, informative commit messages. A commit need not represent a finished feature, but it should leave the repository internally coherent when possible.
Always inspect your local repository thoroughly before committing, in order to minimize the potential for mistakes. Two Git commands that you will find yourself typing often
git status
git diff
(We haven’t had a chance to talk about unit tests, yet, but you should always run all the tests before committing changes. More on this later.)
In principle Git allows you to commit all the changes in your working copy at the same time
git commit -a -m "message"but it is generally better to group modified files in small sets of related changes, each one with its own, informative commit message.
git add file1 file2 file3
git commit -m "message"
Note if you are committing a new file, you have to add it first.
What makes a good commit message? It might be more instructive start from what makes a bad commit message: “minor”, “fix”, “work”, “latest version” are all terrible comments, and they convey absolutely nothing about the intent of the commit. Please refrain from using them.
We already made the point that with a distributed version control system the workflow is inherently non linear, so that commits cannot be simply identified with a sequential integer. How does Git do that?
Well, look at this one for example. Its identifier, which you can tell from the url in the address bar of your browser, is 00df7eda11013a983d907985dd675873e01ffb70. What the hell is that? It is 160-bit hash (normally written as 40 hexadecimal characters) created from the metadata associated to the commit itself, such as the project name, the author of the change, the parent commit and the commit message. Clever, isn’t it?
Push changes to the remote server frequently—at the very least at the end of each working session. All your work is tracked into the local version of the repository, but if your laptop breaks down or gest stolen and your last remote push is three months old, you are in trouble.
3.3.7 Merging changes
Sooner or later the time will come (hopefully) when your task is completed, your new feature is ready from prime time, and you want to move forward and merge the changes back into the main branch, or any other branch.
The basic rule, here is: always merge changes via a pull request. A pull request is basically a proposal to merge a set of changes from a source branch to a destination branch (typically the main). Pull requests can be open through the web interface, no matter whether you use GitHub or Codeberg, and the process should be largely self-explaining.
The pull request machinery is very effective in organizing the formal merge proposal into a set of useful things that provide full insight into what is being changed:
- a view of the complete diff;
- a place to describe the motivations for the changes;
- results from unit tests;
- a permanent link between discussion and implementation.
It doesn’t matter if you work in a large team or by yourself, pull requests are the way to merge changes. If you work in a team, ideally every pull request should be reviewed by a fellow team member before being merged. It goes without saying, the smallest the pull request, the easiest the review.
As soon as the pull request is merged, you can clean up things, switching back to main and deleting the development branch, which is no longer necessary. (Both GitHub and Codeberg will offer you a button to trigger the deletion.)
This completes our journey through the first successful implementation of a change. That was a lot. You will refine your own workflow as you move forward, but you can keep this tentative list of steps as a reference. There’s still a couple of things we want to mention, but we are almost there.
3.3.8 Resolving conflicts
If your branch has no commits behind the main, or there are no conflicts with the main branch, merging a pull request is as easy as pushing a button.
Now imagine that the main has changed while you were working on your development branch—maybe another person has merged in their own bug fix or new feature. Your branch is now \(n\) commits ahead and \(m\) commits behind of the main. The first thing you do is merging the main into your branch. (Pay attention: not the other way around.)
# Check out your branch
git switch my-branch

# Always make sure you have no uncommitted changes
git status

# Get the latest remote state
git fetch origin

# Merge the latest main into your branch
git merge origin/main
This could go smooth, if you and your fellow developer who just beat you merging into the main branch happened to have touched different files, or even the same files in different places. Git is more than good at merging changes—it is almost miraculous: here is a story of an automatic merge that git managed to do from 66 different branches of the Linux kernel. (This is unusual, though. So much so that this one caught the attention of Linus Torvalds, no less.)
That all said, there will be cases when there isn’t an obvious way to automatically merge things, and human intervention is needed. Maybe developers A and B just do not agree on how to do things, and started a commit war that a third person needs to stop. Git will be very clear about which files have conflicts and need to be fixed by hand: you will get a message on your terminal when you do the merge, and the problematic sections inside the files will be marked with exactly three marker lines:
<<<<<<< HEAD
your version
=======
incoming version
>>>>>>> main
Your text editor might even do something clever with the git annotation, and provide facilities to help you pick a course of action. Apply the necessary changes, remove the marker lines, and then commit and push the changes as usual.
3.3.9 Tagging the repository
We are all used to software versioning. The operating system on your computer or on your smartphone comes with a version. Every program that you use comes with a version and, e.g.,
git --versionwill happily print on the screen the version of Git installed on your machine.
This naturally brings up the question of whether you should be versioning your code, and the answer is, generally speaking, yes.
From the standpoint of version control, versioning is achieved through tagging. Formally, a Git tag is a permanent name attached to a particular commit, and is customarily used to mark a snapshot of the repository that has some significance. The two commands
git tag -a v1.0.0 -m "message"
git push origin --tags
create an annotated tag in the local repository and push the tag(s) to the remote server.
All modern hosting services provide an ecosystem of actions that you can trigger upon specific events, such as Git tags, to produce a rich variety of effect—for instance, you could produce and archive release artifacts every time you tag the repo.
3.3.10 What shall I track in the first place?
Sooner or later, I guarantee, the moment will come when you will push by mistake to the remote server a 1.2 GB file happening to float around in your working copy for reason that you don’t fully understand. That will be also the moment you will fully realize how good Git is at tracking stuff, as from that point on a fresh clone of the full repository will take forever. Sure enough you can do
git rm that_awfully_large_file
git add that_awfully_large_file
git commit -m "Remove huge file previously committed by mistake"
git push
and that will remove the file from all future versions of your branch, but not from the history.
(Now, if you are really motivated, there are nuclear weapons that you can use to sanitize a Git repository that you abused with a file that was too large, but this problem is relevant enough that many repositories have pre-commit hooks setup that will happily refuse to accept commits that are too large. Period.)
This brings up the important question: what exactly shall I track in my repository?
Well… repositories a basically for source code, and source code comes in the form of text files. The vast majority of the content of your repository should be in text form. Dealing with text is were version control systems shine, as changes can be efficiently saved as diffs—remember? (On the other hand, when you put binary files in a repo, modifying them pretty much amounts to creating a new full copy every time.)
Of course not all the text must necessarily be source code. If you have text configuration files, that’s totally legit. Documentation is also most welcome—there is hardly ever enough of that. If your tests require small mock files, be they text or binary, that is also fine. And that’s pretty much it.
And is a cursory list of things that, most likely, you don’t want to commit to a repository:
- any generated artifact or intermediate file that can be produced from other sources;
- temporary files produced by your operating system or any program—
DS_Storeis a classic; - private tokens or credentials;
- large data files.
The last, as we said, is the one you should especially pay attention to.
3.4 Ancillary tools
Though Git provides all the core functionality that you need for version control, and GitHub and Codeberg run on top of Git, there are other important tools that you will be using if you start developing code.
3.4.1 Issue tracking
Any software project that is developed in a vaguely reasonable way will offer a place where you can file bugs or ask for features. Here is Python’s. The thing is customarily called an issue tracker.
The nice things is: both GitHub and Codeberg, if you want, provide you for free an issue tracker associated to each repository that you create. Here is the issue tracker for these lecture notes—use it without hesitation if you find a mistake or something might be explained better.
Get into the mood of using the issue tracker for your projects. It is definitely the right place to discuss changes before, while and after the fact. A few months or years down the road you will be grateful to yourself for the fact that you didn’t just fixed that bug—you planned the fixed, discuss the possible solutions and describe the actual implementation.
3.4.2 Actions
Actions are basically tasks that get triggered by a specific event in a Git repository, e.g., a push on the main, the update of a pull request or the creation of a tag.
Typical use cases for actions include:
- running the unit tests in response to updates to a pull request;
- building the documentation when the main is tagged;
- publishing a package on PyPI when a new version is released.
From a practical standpoint, actions are built in the form of suitable yaml files that specify completely what is done and when. Sounds powerful? Well, actions are powerful, and now that you know they exist you can work your way through them.
3.4.3 Forking
If you look carefully the entry page for your repository in either GitHub or Codeberg, you might have noticed a small Fork icon on the top right. What is that for, you are wondering?
Fork: a codebase that is created by duplicating an existing codebase and, generally, is subsequently modified independently of the original. (Source: Wikipedia.)
Why on Earth would you want to fork a repository? Didn’t we say somewhere that duplicating code is bad? Well… generally yes, but not in this particular case.
Say you found an error in these notes—unlikely, I know. You might open an issue on the issue tracker, so that the authors can pick it up and fix it. Or, you might be so kind to be willing to fix it yourself! The problem is: you don’t have write access to the repository, and you cannot push changes.
One solution is to drop the owner of the repository a line asking to become a collaborator on the project. They might say yes or no. Granting write permissions on a repository is generally a big thing that requites trust. In any event, this is not the best course of action for a casual fix—collaborating is… well, for collaborating, as in “working together regularly”.
Forking is the perfect solution for this use case. You get a perfect replica of the original repository under your own Codeberg or GitHub account, and you can do whatever you want with it. Including fixing the error in these notes. If you fail to see where we are going with this, there’s a very nice feature that the forking mechanism provides: you can open a pull request to the original repository from your forked one. How cool is that? Then the owner of the original repo can pic it up and merge it, if they please.
When you open a pull request to the original repository you have the option to “Allow edits from maintainers on the PR”—remember: the maintainers of the original repo own the repo itself, but the branch that you propose to merge in lives in your fork and is under your control. It is generally advisable to allow the maintainers edit the pull request branch, provided that you trust them, so that they can make edits as they see fit before the actual merge.
Here is a nice tutorial on the whole forking-branching-changing-making-a-pull-request thing.